How to Make a Crochet Pillow Cover: Easy Step-by-Step Guide
A handmade pillow can change the look of a room without the cost of buying new furniture or expensive home accessories. If you enjoy cozy home decor, learning how to make a crochet pillow cover is a wonderful way to add color, texture, and personality to your living space.
The best part? You don’t need advanced crochet skills to get started. With basic stitches, a suitable yarn, and a little patience, you can create a beautiful cushion cover that matches your bedroom, living room, or favorite reading corner.
In this beginner-friendly guide, you’ll learn how to choose the right materials, measure your pillow insert, crochet the front and back panels, join the pieces, and finish your project neatly. You’ll also discover different crochet pillow cover patterns, practical tips, and easy ways to customize your design.
Whether you prefer simple modern textures or colorful granny squares, there’s a style you can make your own.
What Is a Crochet Pillow Cover?
A crochet pillow cover is a handmade fabric covering designed to fit over a pillow insert. You create it by working yarn with a crochet hook, then shape the finished fabric into a cover that can be sewn, stitched, buttoned, or closed with a zipper.
Unlike a store-bought cushion cover, a handmade design lets you choose the exact colors, stitches, dimensions, and decorative details you want.
You can create a crochet pillow cover for almost any decorating style, including:
- Modern: Neutral yarn, clean lines, and simple stitches.
- Boho: Colorful granny squares, fringe, and earthy shades.
- Farmhouse: Cream, beige, sage green, and textured stitches.
- Coastal: White, sand, pale blue, and soft ocean-inspired colors.
- Romantic: Floral motifs, lace patterns, and delicate pastel shades.
A removable cover is especially useful because you can take it off for cleaning or replace it when you want to refresh your decor.
Materials You Need to Make a Crochet Pillow Cover
Gathering your supplies before you begin makes the project easier and helps you avoid interruptions.

Yarn
Worsted-weight cotton or an acrylic blend is a practical starting choice.

Crochet tools
A suitable hook, scissors, yarn needle, and stitch markers.

Pillow insert
Use the insert you plan to cover so you can measure accurately.
You’ll need the following supplies:
- Yarn in your preferred color and weight
- A crochet hook suited to your yarn
- Scissors
- A yarn or tapestry needle
- Stitch markers, if needed
- A pillow insert
- Optional buttons, a zipper, or fabric for a backing panel
Which yarn is best for a crochet pillow cover?
Cotton yarn is a good choice when you want a breathable fabric with clear stitch definition. Acrylic yarn is often affordable, available in many colors, and easy to find. A cotton-acrylic blend can offer a balance of softness and durability.
Choose yarn that feels comfortable against the skin and is suitable for the care routine you prefer. Check the yarn label for washing instructions before you start.
For your first project, medium-weight yarn is usually easier to handle than very thin lace yarn. It also helps the stitches become visible, making it easier to spot mistakes.
What size crochet hook should you use?
A 5 mm hook is a common starting point for worsted-weight yarn, but the correct size depends on the yarn label and the fabric you want to create.
Make a small crochet swatch before beginning. If the fabric feels too stiff, try a larger hook. If the stitches look loose and the pillow insert shows through, a smaller hook may help.
How to Measure Your Pillow Insert
Before crocheting, measure the width and height of your pillow insert. Many standard square cushions measure 16 × 16 inches, 18 × 18 inches, or 20 × 20 inches, but you should use your actual insert measurements.
For a simple square crochet pillow cover, you can make two panels that match the insert or create one long panel that folds around it.
Here is a basic planning guide:
| Pillow insert | Suggested cover approach |
|---|---|
| 12 × 12 inches | Small accent cushion |
| 16 × 16 inches | Compact sofa or chair cushion |
| 18 × 18 inches | Common decorative cushion |
| 20 × 20 inches | Larger sofa cushion |
These are common planning sizes, not fixed rules. Your crochet gauge and stitch pattern will determine the finished dimensions.
Helpful tip: If your crochet fabric stretches easily, make a test swatch and measure it after gently stretching it. Aim for a snug fit without forcing the insert into the cover.
How to Make a Crochet Pillow Cover Step by Step
This beginner method uses two simple crochet panels joined around a pillow insert. You can make both panels in single crochet for a clean, modern look or use granny squares for a more decorative finish.
Step 1: Choose Your Crochet Pillow Cover Pattern

Start by deciding what you want the finished cushion to look like. A single-crochet cover is a good first project because it uses a simple stitch and creates a fairly dense fabric.
If you want more color and visual interest, consider granny squares. You can crochet individual squares and join them together to form a larger front panel.
Choose a pattern based on your skill level, available time, and decorating style. A simple design can look just as attractive as a complicated one when you use beautiful yarn colors and finish the edges neatly.
Step 2: Make a Gauge Swatch

Create a small sample using the stitch pattern and hook you plan to use. Measure the swatch to find out how many stitches and rows fit into a specific area.
For example, suppose your swatch measures 4 inches wide and contains 16 stitches. Your stitch gauge is 4 stitches per inch.
For an 18-inch-wide panel, your approximate starting stitch count would be:
18 inches × 4 stitches per inch = 72 stitches.
This is only an estimate. You may need to adjust the starting chain and row count depending on your stitch pattern and turning-chain rules.
A gauge swatch can save time because it helps prevent a finished panel that is too small or too large for your pillow.
Step 3: Crochet the Front Panel

To create a simple single-crochet panel:
- Make a foundation chain based on your gauge and desired width.
- Insert your hook into the appropriate chain.
- Yarn over and pull up a loop.
- Yarn over again and pull through both loops.
- Repeat across the row.
- Chain one and turn, if required by your pattern.
- Continue until the panel reaches the required height.
Count your stitches at the end of each row. If you accidentally add stitches, your panel may become wider as you work. Missing stitches can make the sides narrow.
For a decorative front, you can replace the plain panel with joined granny squares, textured stitches, stripes, or a floral motif. Just remember to measure the completed piece before assembling the cover.
Step 4: Crochet the Back Panel

Make a second panel using the same yarn and stitch pattern. Check that both panels have matching dimensions before joining them.
You can also create a different back design. For example, use a textured crochet front and a simple single-crochet back to save time and yarn.
Another option is to make an overlapping back with two smaller panels. This creates an envelope-style opening that allows you to remove the pillow insert without adding a zipper.
If you plan to use buttons, leave enough overlap and make buttonholes that fit your chosen buttons.
Step 5: Join the Two Panels

Place the front and back panels together with the edges aligned. You can join them with a slip stitch, single crochet, or tapestry needle and yarn.
Work slowly around three sides first if you want to insert the pillow before closing the final edge. Keep your stitches even and avoid pulling the joining yarn too tightly.
For a neat finish:
- Match the corners before joining.
- Count stitches along each edge where practical.
- Use the same joining method on both sides.
- Check that the seam does not twist or bunch.
- Leave one edge open for the pillow insert.
If you prefer a removable cover, finish the opening with buttons, a zipper, or an envelope-style back instead of permanently closing every side.
Step 6: Insert the Pillow and Finish the Cover

Turn the cover right side out if needed, then gently insert your pillow. Ease the corners into place rather than pulling hard on the crochet fabric.
Close the remaining opening using your chosen method. Weave in loose yarn ends with a tapestry needle, hiding them inside the stitches so they do not unravel or show on the front.
Finally, arrange the stitches and corners by hand. If the cover looks uneven, check whether the insert is sitting correctly before assuming the crochet panels are misshapen.
A finishing detail that makes a difference: Let the cover rest on the insert for a few minutes, then check the seams and corners again. This gives you a chance to spot tight joins or areas where the insert is pushing through the fabric.
Popular Crochet Pillow Cover Patterns to Try
Once you understand the basic construction, you can experiment with different crochet pillow cover patterns. The right choice depends on the look you want and how comfortable you are with crochet stitches.
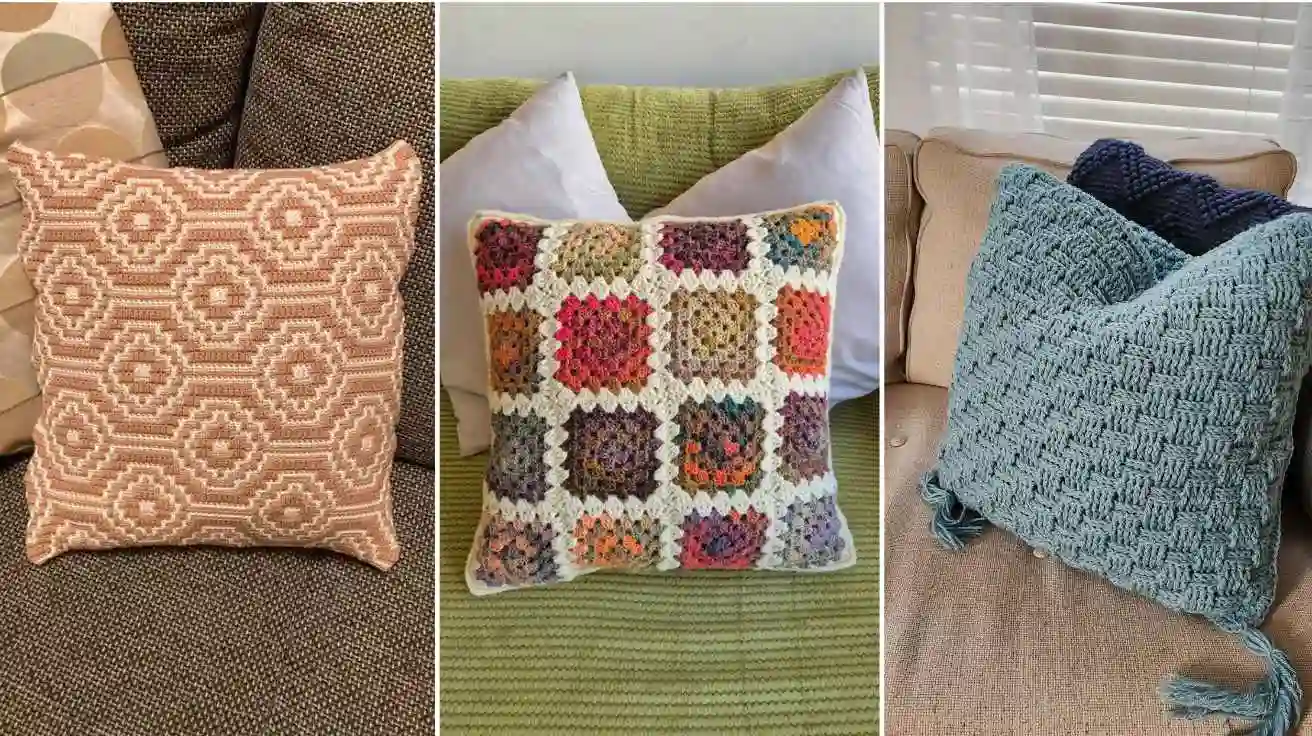
1. Granny Square Pillow Cover

Granny squares are ideal for using leftover yarn and creating colorful designs. Arrange the squares in a checkerboard, rainbow, or floral layout before joining them. This style works particularly well in boho and cottage-inspired rooms.
2. Simple Single-Crochet Cover

This design uses basic stitches and a clean shape. Choose cream, charcoal, taupe, or sage green yarn for a modern look. A simple border can make the finished cushion appear polished without adding much work.
3. Textured Crochet Pillow

Raised stitches create depth and a cozy appearance. Basket-weave, ribbed, and other textured stitch patterns can look beautiful on larger cushions. These patterns may use more yarn, so check the pattern requirements before beginning.
4. Striped Crochet Pillow Cover

Stripes are a simple way to introduce color without learning complex stitches. Alternate two or three shades, or make narrow stripes from yarn scraps. Carrying yarn neatly or weaving in color-change ends will help the back look tidy.
5. Floral Crochet Pillow

Flower motifs add a decorative touch to bedrooms, reading corners, and cottage-style living rooms. You can crochet flowers separately and sew them onto a plain panel or use a floral square pattern for the entire front.
How Much Yarn Do You Need for a Crochet Pillow Cover?
The amount of yarn depends on the pillow size, yarn weight, stitch pattern, hook size, and how tightly you crochet.
For a standard 18 × 18-inch cushion, you might begin by budgeting approximately 300–600 grams of medium-weight yarn for a two-panel cover. Treat this as a rough planning estimate, not a guaranteed requirement; dense stitches and textured designs can use considerably more yarn.
Before buying supplies, check these factors:
- Pillow size: Larger covers need more fabric.
- Stitch pattern: Open stitches may use less yarn than dense or raised stitches.
- Yarn thickness: Thicker yarn usually creates a larger, heavier fabric.
- Construction: A full crochet back generally requires more yarn than a fabric backing.
If possible, purchase enough yarn from the same dye lot to avoid noticeable color differences between skeins.
Tips for Making a Professional-Looking Crochet Pillow Cover
A successful project is not only about learning the stitches. The details of sizing, assembly, and finishing help determine whether your cushion looks neat and fits well.
- Keep your tension consistent. Avoid crocheting the first rows tightly and the later rows loosely.
- Count your stitches. Checking each row prevents uneven edges and unexpected changes in width.
- Choose a washable yarn. This is especially useful for cushions in busy living rooms.
- Measure before joining. Two panels that look similar may differ by an inch or more.
- Secure every loose end. Weave the ends through several stitches in different directions to help prevent unraveling.
- Plan the closure early. Decide whether you want a sewn seam, buttons, a zipper, or an envelope back before finishing the panels.
How to keep a crochet pillow cover from stretching
Crochet fabric can stretch under the weight of a pillow insert, especially when the stitches are loose or the yarn has a lot of give.
Use a suitable hook, check your gauge, and avoid making the cover excessively large. A removable fabric lining can help support an open or stretchy crochet design, particularly when you use granny squares or decorative stitches with gaps.
If you want a dense cover, choose a stitch pattern that leaves little space between stitches. This also reduces the chance of the pillow insert showing through.
How to Wash and Care for Your Crochet Pillow Cover
Care depends on the fiber and construction. Always follow the yarn label and any instructions included with your pattern.
For removable covers, take the cover off before washing. Cotton and acrylic yarns may tolerate gentle machine washing, but not every yarn or finished item is machine-safe. Handwashing can be a safer choice for delicate motifs, embellishments, or covers with sewn-on decorations.
Use a mild detergent and avoid aggressive twisting or wringing. Reshape the cover while it is damp and let it dry according to the yarn’s care instructions.
If you used buttons, a zipper, or a fabric lining, check that those materials can tolerate the same cleaning method.
A Simple Way to Customize Your Crochet Pillow Cover
One of the easiest ways to create a design that looks intentional is to choose colors from your existing room rather than starting with a random color combination.
Look at your curtains, rug, bedding, or wall art and select two or three shades that already appear in the space. For example, a cream cushion with sage-green details can complement a neutral sofa, while terracotta and beige can work beautifully in a warm, earthy room.
You can also change the appearance of a simple pattern without changing the stitches. Add a contrasting border, alternate colors every few rows, or crochet a few motifs and attach them to the front panel.
A useful design trick: Keep the back of a decorative pillow simple and focus your detailed work on the front. This reduces the time required while allowing the finished cover to look carefully designed from the front and remain practical for everyday use.
Frequently Asked Questions About Crochet Pillow Covers
1. Is a crochet pillow cover easy for beginners?
Yes. A crochet pillow cover is a suitable beginner project if you know how to make a foundation chain and work basic stitches such as single crochet. Start with two simple rectangular panels before trying granny squares, textured stitches, or decorative motifs.
2. What is the best stitch for a crochet pillow cover?
Single crochet is a good choice for beginners because it creates a dense, sturdy fabric. Half double crochet is another option if you prefer a slightly softer texture. Granny squares, basket-weave stitches, and ribbed stitches are useful for more decorative designs.
3. How long does it take to crochet a pillow cover?
A simple cushion cover may take several evenings to complete, depending on your crochet speed, yarn thickness, and pattern. A basic two-panel design generally takes less time than a cover made from many individual granny squares that must be joined together.
4. Can I crochet a pillow cover without sewing?
Yes. You can join crochet panels using slip stitches or single crochet instead of sewing them with a needle. You can also make an envelope-style cover with overlapping crochet panels so you can insert and remove the pillow without sewing a permanent closure.
5. Can I wash a crochet pillow cover in a washing machine?
Some crochet pillow covers can be machine-washed, but it depends on the yarn fiber, stitch pattern, and attached decorations. Check the yarn label first. If you’re unsure, handwash the cover gently and dry it according to the manufacturer’s care instructions.